# Analytics Integration
Connect Google Analytics to unlock two powerful features:
1. **Use GA4 events as conversion goals** - Track any GA4 event (purchases, signups, etc.) as your experiment goal
2. **Measure Dalton's overall impact** - Compare Optimized vs. Control traffic in your GA4 reports
[Learn more about Conversion Goals](/optimization/conversion-goals)
[Google Analytics](#events-sent-to-google-analytics) · [Google Tag Manager](#google-tag-manager)
## Holdout Group for Impact Tracking
Dalton uses a holdout group to measure overall performance:
- **Optimized (80%)**: Traffic seeing Dalton's experiments
- **Control (20%)**: Traffic seeing original pages (no experiments)
Compare these two groups in GA4 to see the combined effect of all Dalton optimizations.
::: tip Adjustable Holdout
The control percentage (default 20%) can be changed in Dalton settings.
:::
## Events Sent to Google Analytics
Dalton sends two events to GA4 on every page visit where an experiment is active:
| Event | Parameter | Values | Purpose |
| --- | --- | --- | --- |
| `dalton` | `type` | `optimized` or `control` | Identifies whether the visitor is in the Optimized or Control group |
| `dalton_experiment` | `variantId` | The active variant's ID | Identifies which specific experiment variant the visitor is exposed to |
Use the `dalton` event to measure Dalton's overall impact (Optimized vs. Control), and the `dalton_experiment` event to break results down by individual experiment.
::: tip Always pushed to the data layer
These events are pushed to `window.dataLayer` on every qualifying page visit, regardless of whether you've connected GA4 to Dalton. That means you can pick them up in GTM (or any other data-layer-aware tool) even before completing the GA4 integration.
:::
::: warning Use `dalton_experiment` carefully for raw analysis
The `dalton_experiment` event is useful if you want to pull raw exposure data into your own analysis. Be aware though that interpreting it directly is risky: Dalton uses moving traffic splits and multi-armed bandit allocation, so the share of traffic going to each variant changes over time. A naive conversion-rate comparison in GA4 will conflate variant performance with allocation shifts and seasonality.
Dalton's dashboards correct for adaptive allocation and seasonality to produce a robust uplift.
:::
## Setup in Google Analytics
Follow these steps to set up audiences in GA4 that track Optimized vs. Control traffic.
### Step 1: Verify Events Are Coming In
Before setting anything up, confirm GA4 is actually receiving Dalton's events.
1. In GA4, go to **Reports → Realtime → Overview**
2. Open a page on your site where a Dalton experiment is active
3. In the Realtime report, check the **Event count by Event name** card and confirm a **`dalton`** event (and, if applicable, `dalton_experiment`) shows up and is counting
If the `dalton` event appears here, data is flowing and you can continue. If it doesn't show up after a minute or two, the events aren't reaching GA4 yet — see the [Google Tag Manager](#google-tag-manager) section below if your GA4 is wired through GTM.
### Step 2: Create New Audience
Navigate to **Settings → Audiences → New Audience**

### Step 3: Configure Custom Audience
1. Click **Create a custom audience**
2. Select **Events** as source
3. Choose **dalton** event

### Step 4: Set Audience Conditions
Create two audiences using the `type` dimension:
- One where `type = 'optimized'`
- One where `type = 'control'`

## View Results in GA4
Once audiences are set up, compare Optimized vs. Control performance in any GA4 report.
### Add Comparison
1. Open any report (e.g., Landing Pages)
2. Click **Add Comparison** at the top

3. Create comparison groups based on **Audience Name**

You'll now see side-by-side performance of Optimized (Dalton experiments) vs. Control (original pages) for metrics like conversion rate, bounce rate, and revenue.
## Google Tag Manager
If your GA4 setup is wired through Google Tag Manager, the `dalton` and `dalton_experiment` events (and their `type` and `variantId` parameters) won't reach GA4 unless you forward them with a tag in GTM.
📥 Download the GTM container template — import this file into GTM to set everything up in one go.
The fastest way is to import this ready-made container template:
1. In GTM, go to **Admin → Import Container**
2. Select the downloaded file
3. Choose your workspace
4. Pick **Merge** (so it doesn't overwrite your existing setup) and confirm
5. Publish
::: warning Important: set your own GA4 Measurement ID
The template ships with a placeholder ID, so before publishing you **must** replace it with your own. In GTM, click on the created **`Dalton_Tag`** and adjust the **Google Analytics Measurement ID** field to your own GA4 Measurement ID (the `G-XXXXXXXXXX`). Until you do this, no events will reach your GA4 property.
**Where to find your Measurement ID:**
1. Log in to your Google Analytics account
2. Click **Admin** (the gear icon) in the bottom-left corner
3. Under the **Property** column, click **Data collection and modification**, then select **Data streams**
4. Click the **Web** tab and select your website's data stream
5. Your Measurement ID is displayed in the top-right corner of the stream details window
:::
Prefer to build it by hand? You don't need to set up the variables and trigger separately first — start from a new tag and create them inline as you go.
### Step 1: Get your GA4 Measurement ID
Grab your GA4 Measurement ID (the `G-XXXXXXXXXX`) and copy it now — you'll paste it into the tag in the next step.
**How to find your Measurement ID:**
1. Log in to your Google Analytics account
2. Click **Admin** (the gear icon) in the bottom-left corner
3. Under the **Property** column, click **Data collection and modification**, then select **Data streams**
4. Click the **Web** tab and select your website's data stream
5. Your Measurement ID is displayed in the top-right corner of the stream details window
### Step 2: Create the GA4 Event tag
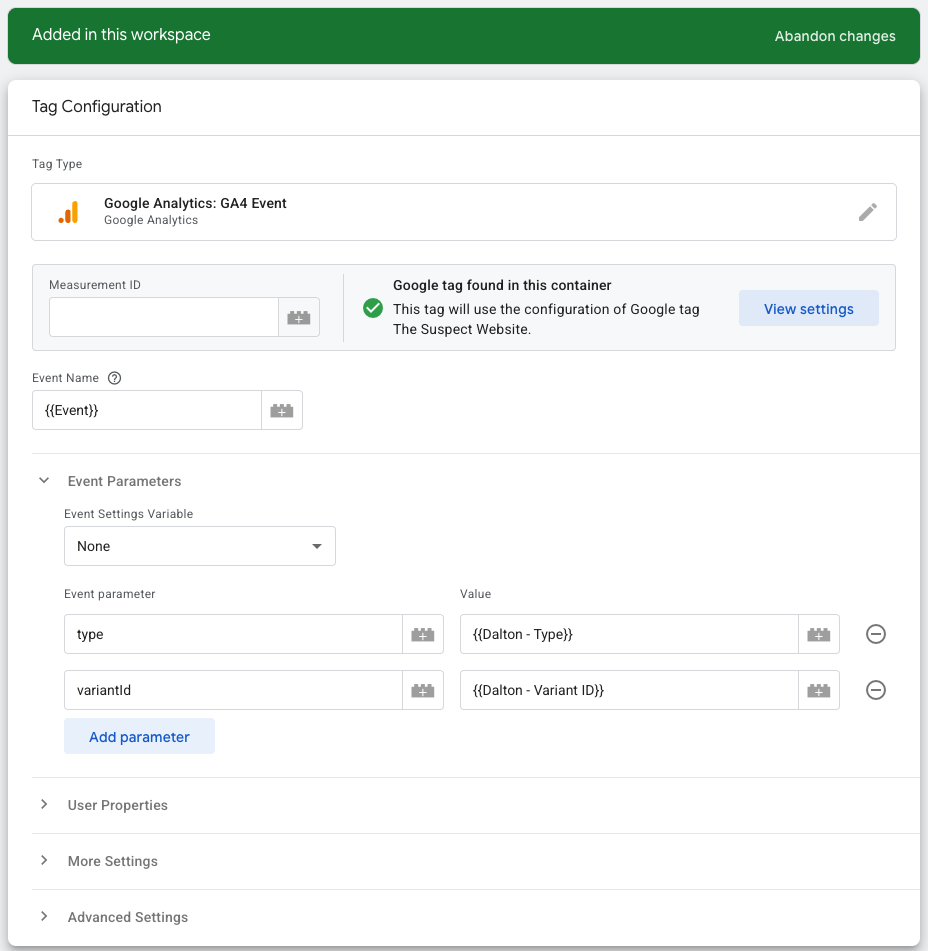
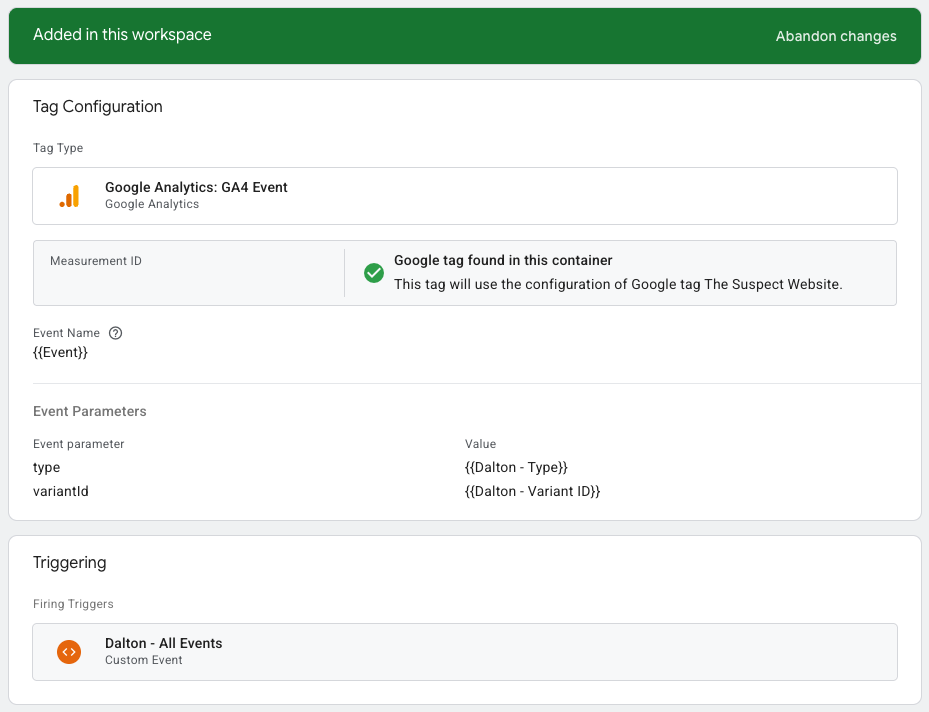
Go to **Tags → New**, click **Tag Configuration**, and choose **Google Analytics: GA4 Event**. Name the tag **`Dalton_Tag`** and set:
- **Measurement ID**: paste the `G-XXXXXXXXXX` you copied in Step 1
- **Event Name**: click the variable picker (the icon to the right of the field), pick **Built-In Variables**, and enable/select **Event** so the field becomes `{{Event}}` — this forwards the original event name (`dalton` / `dalton_experiment`) unchanged
### Step 3: Add the event parameters (creating the variables inline)
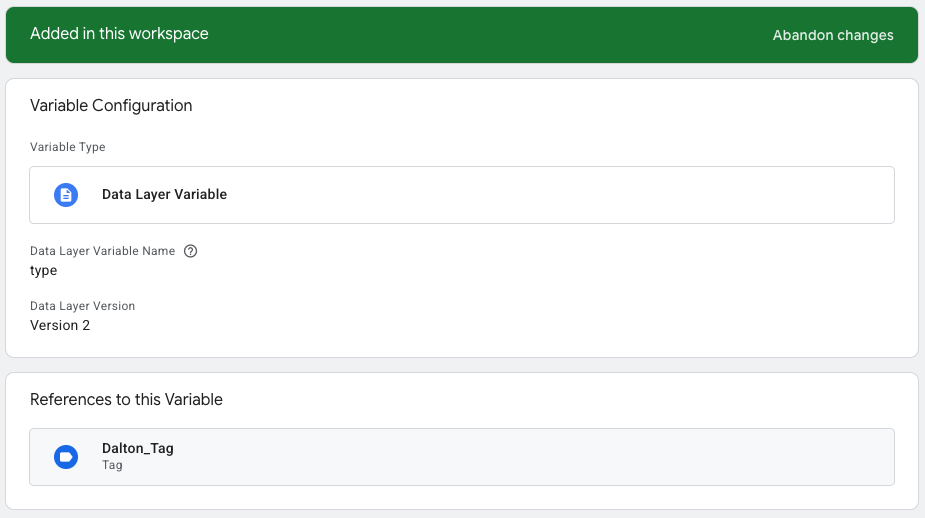
Still in the tag, expand **Event Parameters** and **Add Row** twice. For each row, click the variable picker on the **Value** field → **+ (New Variable)** → **Data Layer Variable** to create it on the spot:
| Parameter Name | New variable | Data Layer Variable Name |
| --- | --- | --- |
| `type` | `Dalton - Type` | `type` |
| `variantId` | `Dalton - Variant ID` | `variantId` |
Each Data Layer Variable should look like this (here, `Dalton - Type` reading the `type` key):
### Step 4: Add the firing trigger (created inline)
Still in the same tag, click the **Triggering** box → **+ (New)** in the top-right → **Trigger Configuration → Custom Event**, then:
- **Name**: `Dalton - All Events`
- **Event name**: `dalton*` with **use matches RegEx** ticked — fires for both `dalton` and `dalton_experiment`
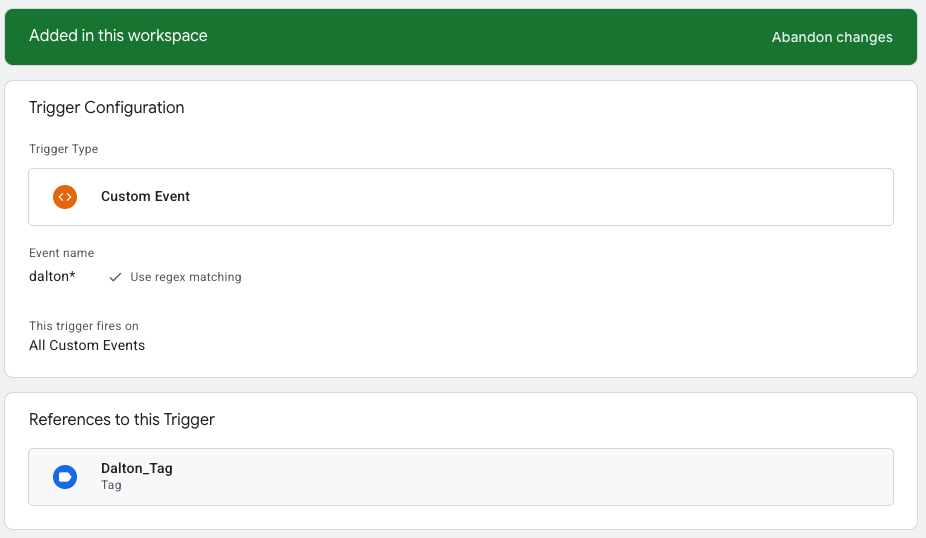
Save the trigger, then **Save** the tag. Your finished tag should look like this:
### Step 5: Preview and publish
Before publishing, click **Preview** in GTM and load a page on your site where a Dalton experiment is active. In the Tag Assistant preview window you should see **`Dalton_Tag`** fire on the `dalton` event, with the `type` and `variantId` parameters populated.
To double-check it's reaching analytics, open your Google Analytics account and go to **Reports → Realtime → Overview** (top of the report). You should see the **`dalton`** events coming in with data in them.
Once that looks right, click **Submit / Publish** to make the container live.
### Step 6: Register the custom dimensions in GA4
Finally, in GA4 register `type` and `variantId` as **Custom Dimensions** (**Admin → Custom definitions → Create custom dimension**, scope *Event*) so they become available in reports and audience builders.
::: tip Verify it's working
After publishing, use GTM **Preview** mode and load a page with an active experiment — you should see `Dalton_Tag` fire on the `dalton` event. Then confirm the event lands in GA4 via **Reports → Realtime → Overview** (the same check as Step 1 of the GA setup above).
:::
::: warning Custom events blocked in GTM?
Some GTM setups restrict which custom events are allowed to forward to GA4. If the `dalton` and `dalton_experiment` events aren't showing up in GA4, make sure the `Dalton - All Events` trigger isn't being blocked by an exception or a consent setting, and that the tag's firing trigger is set correctly.
:::
### Step 7: Continue in Google Analytics
Now that your events are flowing into GA4, head back to the Google Analytics setup to build your audiences and start measuring Dalton's impact.
👉 **[Go to Setup in Google Analytics](#setup-in-google-analytics)**